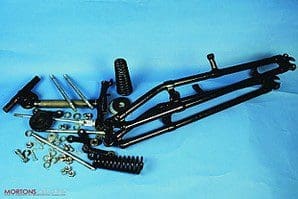
During the early days of motorcycling, a number of front fork designs were tried. Among them were rigid cycle forks with or without bracing, sprung girder, leading link, trailing link and telescopic. Additionally, adventurous makers patented designs such as hub-centre steering – supported on one or both sides – and Duplex steering, as pioneered by OEC, which had a telescopic element too.
Many early pioneer motorcycles relied on bicycle-type rigid forks with no suspension, which were prone to breakages due to the extra weight and higher-than-cycle speeds, plus the poor road surfaces. Engineers sought various solutions to remedy the situation, including the enlightened Rex Motor Manufacturing Company of Coventry, a company, which was among the pioneers of telescopic fork design in the mid-Edwardian period. But the idea favoured by many was the sprung girder fork. Among the leading designers were pioneers Druid, who favoured a side sprung principle, Triumph with a rocking action, Brampton with their Biflex, offering both rocking and up and down movement, leaf-spring control from makers like Indian and Sunbeam and the famous Webb, with centre-spring control.
 Many other variations on the theme were produced – some useless – while many others simply didn’t catch the trade buyers, eye or were developed by makers who lacked the cash to see the project through, and were replaced by something better, more conventional, or commercially available from proprietary makers such as Webb, Druid or Brampton. Many of the leading makers built their own forks, while others bought proprietary items in; here, we look at one leading example, the Druid side-sprung fork with steering damper from a 1929 Norton 16H.
The spindles, spring/s and fork/yokes spindle holes will all wear with use, no matter how thorough the motorcycle’s maintenance. The fork spindles slide though their holes easily, but with no side-to-side or up and down play. Often, most wear is found in the bottom yoke holes and on their mating spindle, as the forks seem to pivot with more force about this point.
Replacement fork spindles should be made from a high tensile steel, such as EN16T, which is a shock resistant tough (55 tons tensile) manganese-molydbenum steel. EN16T fine turns well or can be ground to size. Ideally, to produce true threads, either screw-cut or use a die holder in the lathe with a high speed steel (HSS) die. Some, skilled with hand die holders, can cut true threads but mine would be wobbly, leading to poor fastening of spindle nuts. Never become tempted to use other materials like silver steel (too brittle), bright mild steel (not tough enough) or many of the range of stainless steel alloys (while some may be suitable you may not know the composition of the stainless steel alloy or its qualities) as they are all totally unsuitable, dangerous and, besides, EN16T is available from many specialists stockists at autojumbles, by mail order or directly.
To aid lubrication
Some original spindles had either a groove or flats machined into them to aid lubrication. This needs replicating, and handbooks or parts diagrams may illustrate the positioning of the spindle with groove/flat if appropriate. Although I’m sure I’m teaching granny to suck eggs, remember not to create a sharp angle where the spindle is machined to a smaller diameter for threading or to fit through the link. Instead, machine a slight radius to lessen the risk of shearing at this point.
 Many more recent forks have bushed spindle holes, in which case the old bush is pressed out and replaced by new. Some one make clubs and occasional specialists stock appropriate bushes. Old bushes can be either pressed or, if difficult, machined out – another job for the competent only. Usually, they are thin-wall phosphor bronze structure, with often a 0.001 to 0.0015in interference fit into the hole. Always press them into place – never strike them with a hammer, as they easily bruise. Once fitted, the bushes need minor reaming to restore to spindle size as they will have closed marginally on pressing into the hole. Ideally use a reamer with pilot (guide) spigot to ensure work is true.
Enough ‘meat’
Many veteran and vintage girder forks were un-bushed. If there is enough ‘meat’ it’s possible to either ream spindle holes along their entire length, or machine the ends of fork cross tubes to accept thin-wall bushes. The latter is by far the best option, as when they’re worn again, the bushes can be pressed out and renewed. Both procedures require a high degree of accuracy. Phosphor bronze is an ideal material for these bushes. In extreme cases skilled restorers have fabricated new cross tubes with lugs/spigots, dismantled the fork blade structure, fitted and then brazed or silver soldered them together – work way beyond my ability!
Extreme rust, age and wear softens and weakens springs. Some sources stock common spring sizes, or replicas can be made to a pattern or accurate drawing by specialist spring makers. In some cases, stronger-rated springs are needed for heavy duty use, eg hefty machines or for sidecar work.
While it’s possible to chrome or nickel plate new, un-rusted springs to good effect, once even surface rust has appeared, the job is near impossible for a sound long-term finish as it’s impossible for the metal polisher to polish the inside of spring coils. Some use chemical cleaners, but I’ve yet to see one that works perfectly. However, for many machines the girder fork springs were painted so if they’re second-hand but in good order, they can easily be blasted clean to accept any of the finishes we may consider.
 Due to poor assembly, the spindle holes may have elongated, internal threads – if present – may have been damaged, rust could have caused wasting and in, extreme cases, fatigue cracks may be evident. Many links were malleable iron castings which – unless you’re considering making a large number – are not viable for a business to reproduce. An alternative used by many is to machine them from a suitable mild steel. Again, seek help if unsure.
Many later girder forks are simply greased through conventional grease nipples, with makers recommending intervals of 250 to 1000 miles. I favour lubricating every 250 miles, working on the principle that if the job is overdone, no harm will occur, while under-lubrication will hasten wear.
Some veteran and many vintage models were fitted with oilers. Most vintage models had decent sized holes enabling the use of a thicker oil – such as SAE50 – which lubricates for longer than thinner oils, as it escapes at a slower rate. Veteran and earlier vintage machines often have smaller holes in oilers, making a thinner oil more desirable. Unfortunately, some veterans have no oilers, lubrication is undertaken by laying thin oil across link/friction washer joints in the hope it works in or loosening nuts and links to feed oil onto spindle.
Maker’s interval advice – if there is any – varies. Usually, lubrication in each pre-run check is sound practice.


