Sequential captions and images 1 to 12 are in part one.
Picture 13: At the other side, the clutch lifter arm fits into the top of the crankcase and is located with an eccentric bolt and locknut (left) which serves as a clutch adjuster. With the clutch pushrod, lifter and plates all fitted to the clutch, I can set this adjuster so there’s just a little free play on the lifter mechanism, to prevent the pushrod running under load. The hole aft of the lifter arm is the main engine oil feed; the pipe from the oil reservoir in the frame connects up here.
Picture 14: Back on the drive side now, the camchain drive sprocket slides onto the end of the crank and locates with this large square section key. I’ve fed the new camchain downwards through the camchain tunnel in the barrel and hooked it over the end of the crank; there’s plenty of room to engage it onto its drive sprocket. Camchain replacement is a simple task on these engines, but the cam cover and camshaft has to be removed, so it’s an engine out job to do it.
Picture 15: Outboard of the cam drive sprocket we have the primary drive gear, timing index plate, and this small ignition drive gear, both of which engage onto the same square section key. A single nut, backed by a Belville washer then holds it all together, and again some means of locking the engine is required to tighten it up. I’ve opted to wedge a clean rag between the primary drive gears as I did on the stripdown – a good heave with a socket on a torque wrench secures the nut tightly.
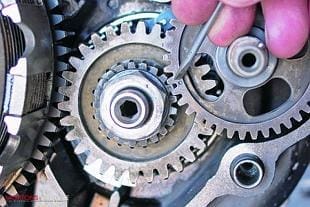
 Picture 16:The ignition on the XT comprises a set of points and auto advance unit mounted in a housing in the clutch cover. They are driven by a dedicated shaft, driven by this gear on the crank. The shaft has a pin to locate the auto advance unit, so to index the timing correctly the drive shaft has to be indexed to the crank. I’ve positioned the engine at TDC (note the T mark aligned to the pointer at the bottom edge of the picture), then fitted the drive shaft so the dot on the drive gear lines up to the dot on the crank sprocket.
Picture 17: I missed this on the stripdown, and in my haste sent the clutch cover away for powder coating with these tiny parts still fitted. Andy at Triple S spotted them, and removed them for me before they got damaged. This ball and spring fits into the back of the clutch case alongside the oil filter housing. The ball seats against a rubber seat (which resembles a tiny oil seal), which I’ve opted to renew. The whole assembly is an anti-drain valve for the lubrication system, and if it fails to seal properly it will allow the engine oil to drain from the tank into the crankcase while the bike is parked.
Picture 18: There are three oil seals in the clutch case; one each for the kick-start shaft and ignition drive shaft, and this one which engages onto the end of the crank. Easily overlooked, this seal controls oil pressure to the big end. A quick phone call to Dave Newitt at the XT Owners’ Club confirms my suspicion that the seal goes in with the spring side facing outwards, towards the oil flow. I’ve greased and positioned a new gasket on the casing, and can now offer it home to the engine’s right hand side, bolting it up with a new set of lovely stainless Allen screws from Inox.
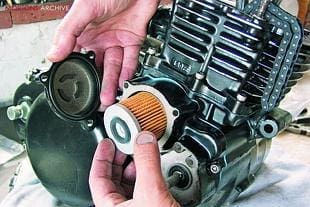
Picture 19: The upper housing on the clutch cover is for the oil filter. Note – there’s no spring on this type of filter, it simply pushes into place and seals with its integral rubber washers. The oil filter cover has a single large O-ring at its periphery and another, tiny O-ring fitted at the lower of the three cover screws. Miss this O-ring out, and the cover will leak oil. There’s also a small bleed screw at the top of the filter cover – once the engine is running, it’s important to momentarily slacken this bleed screw to make sure all air has been expelled from the filter housing.
 Picture 20:The auto advance unit now slides home onto its drive shaft and is secured with a single central M6 bolt. Next, the ignition backplate. I’ll be fitting new points and condenser once the engine is running, but for the initial start-up I’m refitting the backplate in its original position, which I marked with a tiny scribed line to line up to a matching line on the engine casing. A quick check of points gap and static timing is enough to make sure the timing is accurate.
Picture 21: Back to the top end now. Having already lapped in and assembled the valves I can now offer the cylinder head onto its new gasket. Two dowels (on the front right and left rear studs) locate the head, and to hold in place I can loosely fit the two Allen screws fore and aft of the camchain tunnel. I can’t fit the head nuts and torque it down until the cam cover is fitted, but these two screws will temporarily hold everything together. The new head gasket goes in dry.
Picture 22: With the engine set on the T mark (for TDC), I’ve fed the cam sprocket into the chain and positioned the index peg hole at the top. Then the camshaft assembly, complete in its fresh bearings, drops into place and engages with the sprocket, the locating pin finally sliding home to hold it together. Careful with the pin, if it drops into the crankcase it’ll be a pain to retrieve it. Now turn the engine over forwards slowly until the timing marks line up again at the crank, and double check the cam timing. A punch mark on the sprocket should be in line with the jointing face on the head, the dowel pin should be at 12 o’clock, and both cam lobes should be pointing down at equal angles of roughly 45 degrees. When you’re certain it’s correct, fit the centre bolt and washer with a spot of Locktite.
Picture 23: The camchain tensioner now screws into the back of the barrel. This spring-loaded plunger should be flush with the end of the adjuster body with the chain at its slackest point, which again is with the engine set at TDC. I’ll be checking this again after the engine has run and settled, but it looks fine for now. Finally, the camchain tensioner is concealed by a large black plastic dome nut, which seals with an O-ring to the back of the barrel.
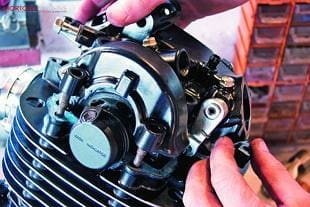
 Picture 24: I’ve assembled the rocker arms back into the cam cover, but before fitting the cover I’ve also assembled the tacho drive gear and valve lifter arm, with its return spring and new oil seal. Note the circular alloy cap that conceals the end of the camshaft – I’ve painted this in satin black to match the new engine finish as I didn’t want to disturb the sight glass for the kick indicator. A smear of Hylomar on the jointing face will seal the cam cover – no gasket is fitted here and don’t be tempted to make one, as the extra thickness of a gasket would interfere with the camshaft bearing clearances.
Picture 25: Finally, the five main head nuts can be torqued down progressivley to 25lb-ft and the Allen screws around the camchain tunnel and cambox tightened. I’ve also dialled in some valve clearances of 8 thou inlet and 10 thou exhaust – a little wide as the reground valves will settle once the engine is run. I’ll be rechecking the clearances and ignition timing after the engine’s first run, and again at 500 miles as things bed in. The final touch is a handful of one-off stainless parts from Phil Denton Engineering – the two new rocker spindle end plugs will be added as soon as they come off Phil’s lathe.
See also Rod’s video testing the finished bike


